Rendering in SWAT: PlayStation 2
Last time I went into considerable detail about how Okre’s Xbox renderer worked. In this post I’m going to explain how we got Okre running on PlayStation 2.
The PS2 was a powerful but limited machine. Its speed at rendering to the screen was unsurpassed at the time, but the blending it could do was very limited indeed. Where the Xbox could sample up to four textures and blend them arbitrarily with each other and the current screen contents, the PS2 could only sample a single texture, and either add or alpha blend with the screen. In terms of per-vertex calculations, the PlayStation 2 had a general purpose processor (called VU1) to process vertices, compared to the Xbox’s vertex shader which had a limited instruction set.
As mentioned in the introduction, we were able to leverage Argonaut’s existing PlayStation 2 technology, notably the code that ran Lego Bionicles and I-Ninja1. This meant the most complicated parts had already been written — notably the clipper which was a masterpiece of assembler by Carl Graham (co-designer of the SuperFX chip). The Xbox clipped geometry in hardware whereas the PS2 had to use software clipping, and would crash horribly if got it wrong and let it draw too far off the sides of the screen.
The PS2 had an unusual feature — it supported two separate hardware rendering contexts. A context held settings like texture modes, blending modes, render target and so on. At render time, a triangle could be submitted through either render context. Okre used this to perform lighting and texturing at the same time for dynamic objects: one context had the settings for the texture of an object, the other had the lighting settings. The lighting context was set to add to a different buffer, so by the end of the texturing and lighting pass we would have two screen-size buffers: one would have the unlit, textured scene, and the other with the lighting.
Of course we needed separate separate passes for the scenery geometry, as the lighting geometry was unique for every light. In the case of dynamic objects we could transform and clip all the triangles, and then just submit it to the rendering hardware twice, once per context. This made the lighting reasonably cheap.
Before rendering we initialised the lighting buffer to the ambient colour. Then we added on any self illuminated surfaces, as we did on the Xbox. The PS2 hardware didn’t have all the clever pixel-counting and early outs for Z failures, so we had no “Z stamp” pass.
Because the PS2 didn’t have any per-pixel calculation ability, we couldn’t use bump-mapping4. It also didn’t have 3D textures, so we needed a different way to calculate light falloffs. As the geometry was shared between Xbox and PS2, we had to have a fairly similar lighting function to the Xbox version so we didn’t cause the artists and designers too much pain.
Our solution was to use a 2D texture for falloff, using a fairly simple linear distance-based falloff of 1-sqrt(x*x+y*y). For each triangle, we calculated the plane it was lying on, and considered it to be a planar slice through the sphere of influence of the light. We projected the appropriately scaled coordinates of the triangle onto the plane, and used them as the U and V coordinates of the texture lookup. The distance from the triangle’s plane to the sphere’s centre was used to dim the light’s colour based on distance, and the resulting value used as the vertex colour2. The rendering hardware then looked up the texture per pixel, and multiplied it by the vertex colour giving a final attenuated colour ((1-sqrt(x*x+y*y))*(1-z*z))3. All this could be precalculated for static scenery and lights. For dynamic lights, the same calculation was made in a shader, making them slightly slower.
This is a pretty good approximation of the real function, only really failing on smooth curved objects where each triangle’s plane may have been slightly different to its neighbours, giving possible continuity problems. This turned out not to be too much of a problem as we didn’t have too many smooth shaded surfaces.
Specular lighting was limited, and basically involed another pass adding on an environment mapped “light highlight” texture.
Combining the buffers
The tricky bit then came as we needed to combine the textured scene with the light buffer by multiplying the two together. Unfortunately the PS2 doesn’t have a multiplicative blending mode: the best it can do is multiply textures by a constant value and by either alpha or (1-alpha). Even worse, its idea of “multiplying” two values together is actually (x * y) >> 7 — that is, the result is double the value you’d expect. (Multiplying two 8-bit values together gives a 16-bit answer, and usually you’d shift this back down 8 to get an 8-bit answer out). This “feature” allows you to brighten things by up to 2 times during lighting (for mock specular effects), but actually throws one bit of accuracy each multiply. Aargh!
Thankfully the creative chaps at Sony had published a cunning way to get around these limitations5.
The trick is to “lie” to the hardware about the type of texture you have. By pointing the texture unit at the 32bpp light buffer, but saying “hey, it’s an 8bpp palettized texture”, it was possible to read just one component out (i.e. either red, green or blue). Setting an appropriate palette of (1 in either red, green or blue as appropriate, and index/2 in alpha) would then look up the 8-bit value and get a neutral colour with an alpha value of the “actual” amount. This would be used by the hardware as the value to multiply with, and so you’d get a single component multiplication. Repeat this for green and blue and you’ve done a full screen multiply.
This was made even more complex by the fact the layout of the buffers was not a contiguous ARGB, nor a simple planar format. Instead, when interpreting a 32bpp screen as if it were an 8bpp texture you saw a 16x4 block of pixels for each 8x2 source block:
| 0 | 1 | 2 | 3 | 4 | 5 | 6 | 7 | 0 | 1 | 2 | 3 | 4 | 5 | 6 | 7 |
| 8 | 9 | 10 | 11 | 12 | 13 | 14 | 15 | 8 | 9 | 10 | 11 | 12 | 13 | 14 | 15 |
| 4 | 5 | 6 | 7 | 0 | 1 | 2 | 3 | 4 | 5 | 6 | 7 | 0 | 1 | 2 | 3 |
| 12 | 13 | 14 | 15 | 8 | 9 | 10 | 11 | 12 | 13 | 14 | 15 | 8 | 9 | 10 | 11 |
The colour of each cell indicates which of the four components (red, green, blue or alpha) is stored, and the number indicates which pixel number is stored in an 8 by 2 block of pixels.
Note how the order of pixels 0-7 shifts on the second row, wrapping around by 4. On the next block of pixels this pattern was reversed again, so the subsequent block of pixels has its red and blue pixels rotated by 4, and its green and alpha are stored in linear order.
Selecting a single component from the buffer (when the buffer is viewed as an 8bpp texture), means crafting thousands of quadrilaterals that cherry-pick the right part for each component. We took advantage of the fact the pattern repeated regularly, and so could prepare a set of rendering instructions offline for a single screen block, and reuse that over and over again, just moving the source and destination texture pointers as appropriate. All this could happen on the VU1 chip, leaving the data bus free for the CPU while this operation occured.
Shadows
Apart from the pre-calculated scenery shadows, we couldn’t come up with a viable way to do true dynamic shadows on PS2. There’s no stencil buffer or depth buffer support on PS2 and although there are some tricks to achieve both they’re both very expensive. We were already burning so much processing power doing our lighting so we decided against implementing them.
Instead we went with the more game-y black circle shadow drawn under the characters. Using the collision system, we’d find out where the floor was under the characters, and just plonked a shadow circle there. For shadows cast onto the dynamic objects, we did a ray trace (also using the collision system) of several rays from the objects to their nearby lights. The result of this would be an approximation to how much in shadow an object was, and we darkened the whole object accordingly.
Full screen passes
To get the final image we had a number of full-screen passes, like the Xbox:
- In order to get the camera effect (virtual aperture and exposure), we used a similar technique to the multiply trick to look up the red, green and blue component of the screen in an exposure table.
- The colour bleed effect was one of the easier things to port over: the PS2 supported subtractive blending, so we could threshold the brightest pixels. Then downsampling, re-upsampling and adding was just texture manipulation and additive blending.
- Sampling the brightness of the screen to feedback to the camera effect involved downsampling the screen until it was very small (around 32x32), and then transferring this small texture back from the graphics unit to the main memory where the CPU could read it.
Other stuff
Invaluable in the development process was the PlayStation 2 “Performance Analyser”, which was a gigantic, instrumented PS2 development kit. As far as I can tell it was a normal PS2 with a bunch of very fast RAM and hardware logic probes on all the bus signals. Triggered by a foot switch it would capture all the main signals going on for a whole frame. An application running on the developer’s PC would then let you visualise the captured data. This was handy for finding and fixing bottlenecks, and also at a push for working out why geometry wasn’t turning up in the right place. It required a pretty comprehensive understanding of how the PS2 worked though.
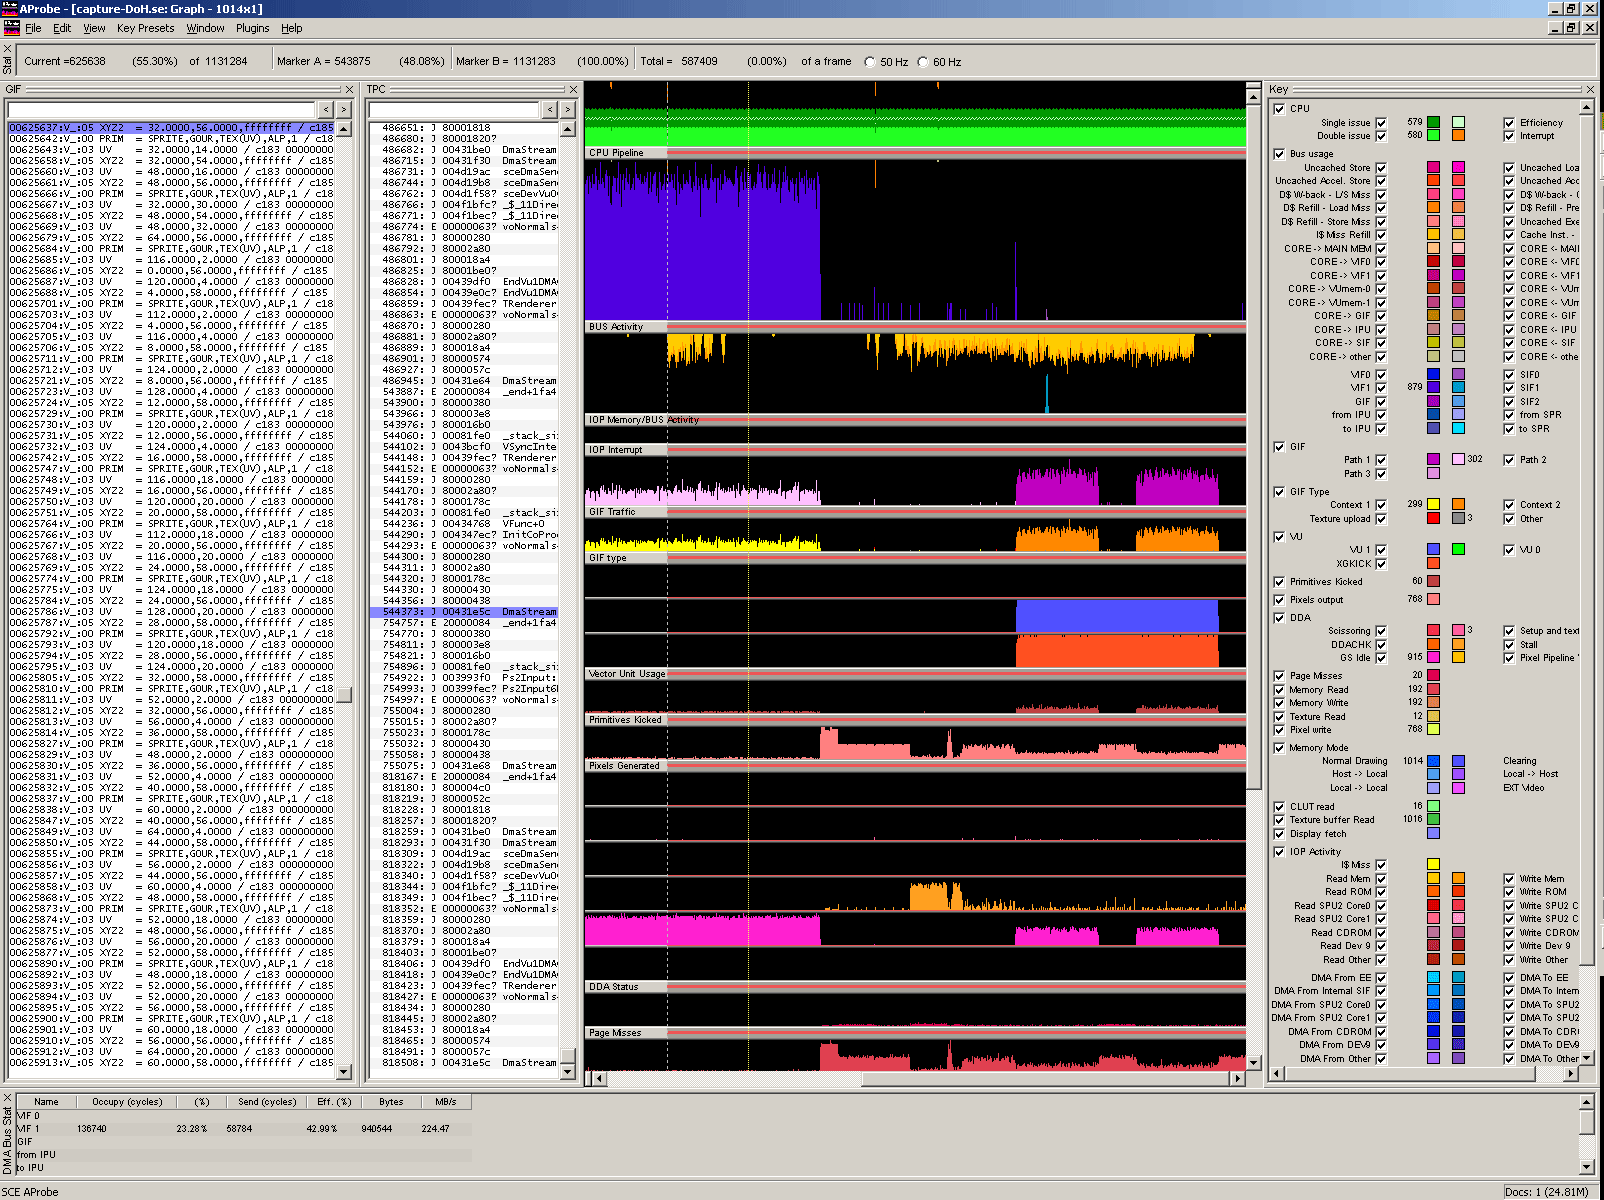
A Performance Analyser scan. It's the only one I could find: it's not actually of SWAT, but of Lego Bionicle's "Depth of Haze" effect. From left to right it shows the graphics commands executed; the location of the last branch the CPU executed; time series of the various control signals; key to the graph. The CPU is actually in a busy spin waiting for the GPU (note the branch panel shows the same locations over and over and the CPU graphs (green at the top) indicate 100% CPU usage - only really achievable in a tight loop with no external dependencies. The rest of the graph is pretty incomprehensible without going into another chapter's worth of post here.
The Xbox had an equivalent system, except instead of being a very expensive piece of hardware, it used software instrumentation to capture essentially the same data although not at the detail of the PS2. The Xbox’s equivalent went on to become DirectX’s PIX, although it was much more powerful owing to the tool knowing exactly what graphics card it was running on. This meant it could do things like display the captured frame and then allow you to click on a pixel somewhere and tell you exactly how that pixel came to be rendered the colour it ended up — which polygons drew over it, what blending modes and textures were used and so on.
Next time I’ll cover some of the other parts of the engine: the collision and AI.
-
Argonaut had the first PlayStation 2 in the UK, and we developed a pretty complete demo of a game called “Cash on Delivery”, which was a Crazy Taxi-like game. Sadly nothing came of it. ↩
-
Staggerinly, the PS2 didn’t interpolate its colours taking into account perspective. This meant we had to be careful to minimise the colour change over larger polygons, particularly if they were next to smaller polygons where it would be more noticeble that the colour interpolation was completely different in each case. ↩
-
I can’t remember how we dealt with normals. I think we just factored them into the colour, but due to the lack of perspective correct colour interpolation something tells me we may have actually ignored normals. ↩
-
Though there are some amazing hacks to get bump-mapping on PS2, we didn’t use any of them. ↩
-
I have a theory that part of the success of the PlayStation consoles comes from their complexity to program and their insane limitations — this gives a gradual increase in game quality as developers learn new tricks the quality improves, giving the console a long lifetime. Gamers see continual improvements in game quality. Compared to Xbox say, where there doesn’t seem to be as big a difference between the quality of first-generation games compared to the later ones. ↩